Kumihimo is the ancient Japanese art of braiding cord (“kumi”= to braid, “himo” = cord). Over the centuries, these cords have been used for religious ceremonies, lacing samurai armor, securing the kimono sash (obi) and other decorative uses. There are hundreds of braiding structures, ranging from simple to very complex, and requiring from 4 to over 100 threads. The braid described here is traditionally made on a round braiding stand (marudai) which uses weighted bobbins to produce a balanced tension and manage long threads. However, some of the more simple braids such as this one can also be done as short samples using a portable diskshaped card, which you can make yourself out of cardboard or craft foam, or purchase in kit form.
These instructions are for one of the simplest braiding structures called kongo gumi (= hard braid), which produces a solid cord with a round crosssection (as opposed to a shoe lacestyle hollow cord or a flat braid). The braiding movements can be made with 8, 12, 16 etc. threads (any multiple of 4) and offer a rich scope of patterns, dependent only on the initial thread colour arrangement. The diagrams at right show threads grouped in pairs, where opposing pairs share the same colour; this initial colour arrangement will produce a diagonal striped cord (below) and is a good “starter” colour pattern to try while getting used to the braiding sequence.
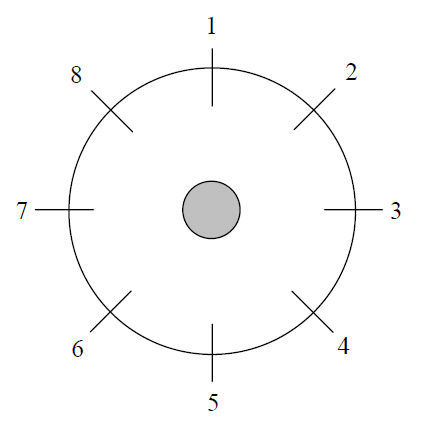
Card setup
To make a braceletsized cord on your braiding wheel:

1. Cut threads about 50 cm (20 in) long – in general, about twice the length of the final cord. Good quality mercerized cotton or rayon embroidery thread, craft thread or crochet cotton are all suitable later, you could try experimenting with splitting or bundling strands, metallic thread, adding beads to one or more strands etc. (Traditionally, bundles of silk threads were used, and precut rayon thread is sold in Japan specifically for kumihimo).
2. Hold the threads together with ends aligned, and secure them using an overhand knot near the end – if you want a simple bracelet “loop” closure, make another overhand knot a short distance from the first using a pencil for a spacer.
3. Bring the unknotted thread ends up through the centre hole (holding the knotted end below with your other hand) and place the threads snugly in their slots according to the diagram, with the knot held tightly in the centre and long ends dangling down. If you are following a special colour pattern (other than the diagonal stripes depicted), it is important to position the “start” thread colour in the “start” slot (marked with an arrow). Threads are placed in opposing pairs, with a space of at least 2 slots between the pairs.
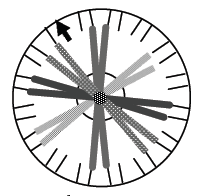
Braiding movements
a. Position the thread pair with the “start” arrow at the top, and the opposing pair at the bottom.

b. Move the thread from position A to position B as shown at right. That is, from the top pair, move the top, right thread into the slot at the bottom just to the right of the opposing pair (you move the thread clockwise and do not crisscross over the opposing pair).
c. Move the thread from position C to position D as shown at right. That is, from the (now) bottom group of three, move the left thread up into the slot to the left of the lone thread at the top (you move the thread clockwise and do not crisscross over the opposing top thread).
d. The wheel will again have pairs of opposing threads. Rotate the wheel COUNTERCLOCKWISE as shown at right, to place the next set of opposing thread pairs at top and bottom.
e. Repeat steps b) through d) until the braid is the desired length.
f. Remove the threads from the slots, and make a double overhand at the point where the braiding ended to secure it. For a simple fastener, pass this knot through the loop you formed around the pencil at the start.

 Tips
Tips
· You can always tell where you left off, because the opposing threads you moved last will be on top. It can be helpful to stop after move b), since you can easily identify the 3thread group.
· Adjust and tighten the threads when required so the “point of braiding” (where the threads come together) stays in the centre and the tension is consistent. When moving a thread, it helps to hold down its neighbour with your thumb.
· Moves will become easier as the cardboard slits wear in, and you can cut the nicks deeper if they start to wear out.
· Check the braid often to ensure that the pattern is emerging correctly. With a 16 (8) thread braid, you will return to the original thread colour arrangement after 16 (8) passes through the set of moves b) to d), although the threads will not be in exactly the same start slots. This produces a repeating pattern block of 4 (2) spiralling rows of stitches as shown on the grid at right. If the pattern is not repeating, you have made a mistake and can just undo the braid back to the problem spot by doing the same braiding movements, but in reverse.
· This braid will stretch, but has no elasticity to bring it back in – so give it a tug to stretch it out before measuring for desired length.
· Tassels are a traditional kumihimo end finish, but you can get many other ideas from the beading and macrame world using buttons, beads, jewelry findings, knotting, etc.
· Uses: jewelry, key chains, eye glass cord, hat bands, chinese knots, …


